Monday, 2 May 2016

The Battle of Raphia _ OK Simon I now know where all the Phalangites went

This is the second look at the To the Strongest weekend at the Wargames Holiday Centre. The biggest game that Simon Miller put together was a recreation of the Battle of Raphia 217 BC. This is a clash between Ptolemy IV and Antiochus III of the Seleucid Empire. This was one of the largest battles of the Hellenistic world and the object of the clash was control of Syria
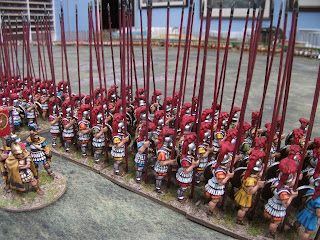
These are a few pictures of the Phalanx units that Simon has created. Hundreds of figures. In ancient texts they often refer to troops "without number" and this is clearly true for Simon's collection.
I was playing the part of Antiochus Megas on leading the Seleucid army. Here you can see some Greek mercenaries supporting Elephants on the right of the Seleucid army.
One of the Phalanx units to the left of the mercenaries. 48 figures. These are led by Byttacus the Macedonian who can be seen in the left of the picture
Over on the left of the Seleucid army are units of arabs led by Aspasianus the Mede
Next to them were Medians armed with spears
Meanwhile the elephant units begin to attack. These are escorted by light troops
The Agema of Antichus hope that charges on the right of the army will cause the Ptolemaic forces to collapse.
A general view of the battle giving some idea of its scale. As usual with games at the WHC it is often likely that generals have no idea what is going on in other parts of the game. 
A view of the Phalanx units of both sides closing on each other
The clash between the elephants on the right flank
Andromachus the Aspendian urges his Phalanx on
More Greek mercenaries
Troops packed into the phalanx
Superb painting on these Greeks
One phalangite clearly wants Leicester City to win the cup!
Simon's rules make use of coins to keep a running score of the moral of the two armies. When you lose all your coins then you have lost the game.
Wedges of Agema pushing through on the Seleucid right
Looking through the sea of pikes
Another view of the phalanx in the Seleucid centre
Even the back row look determined 
I like to look at all the small variations that Simon's figures display
Elephants continue their advance
A view along the line of the Seleucid phalanx 
Elephants closing on the enemy with the Ptolemaic phalanx in the distance 
Cards turning fast in the game.
Phalanx units closing on each other
The deep pike units clash
Elephants and Agema units charge each other on both sides. Antiochus with fight it out with Ptolemy
This Elephant unit looks as if it was based on the old WRG book on the Macedonian and Punic Wars
Head on collision. It should  be noted that their is a difference between the Indian and African Elephants and their ability to absorb punishment  the fighting 
Thus picture shows that the Ptolemaic side has a problem. The phalanx unit in the top of the picture belongs to the Seleucids
The battle ended with the defeat of Ptolemy. The phalanx units in the centre broke through the opponents and began to roll up the units to the left and right. The Elephants defeated their Ptolemaic counterparts and the Agema units went on the victory despite Antiochus being killed in the fighting (loss of six coins alone for that!). Ptolemy himself was also wounded. I confess that some of the pictures were from some of the other games but they do illustrate the general progress of the game. This was the second run of the game in which Antiochus was killed which gave rise to a series of Zombie related novels the first entitled "What Antiochus is dead again?" Simon and a second "Well Antiochus is still dead" Matthew. A very good game and an excellent weekend. Well don Simon and Mark 

Sunday, 1 May 2016

To the Strongest - no Phalangites in these games Simon!

Last weekend I traveled down to Basingstoke to take part in Simon Miller's To the Strongest weekend hosted at the Wargames Holiday Centre by Mark Freeth. Five games were available to play over the weekend and two of these were very large. The rules that Mark has developed remain the perfect blend of simplicity and clever fine tuning that provides plenty to think about as the game progresses. I think the key is that you spend time focused on command decisions for the troops and not on working out actions via tables etc. When I first started playing these rules I was not sure that I would take to a grid table system and the use of cards rather than dice. After several games I have really taken to using cards. The speed at which the cards can be played and the removal at the end of the term helps to keep the table tidy. I also have found that I forget the grid is actually there and this takes away any discussion about flexible views about the how far 100mm actually is! The first set of pictures are from the game based on the Roman Civil War of 69 AD. This was a clash between the forces of Otho and Vitellian. The battle was not actually Cremona but rather a fictitious clash between the forces of both sides. Lots of interesting troops in use such as this Gladiator Cohort on the Othonian side.
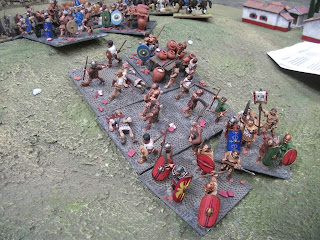
The XXI Rapax Legion toils up hill to face some Legionaries of the XIII Gemina and some veterans from XIV Gemina Victrix
What for the order to charge
Flank attack by the Legion Adiutrix
More legionaries advancing 
Not a lot of pictures for that first game. I was focused on reminding myself of the rules! I also lost the game so the less said about that the better. The next game I was involved in was given the title "Barbarians" and was set after the battle of Chalons 424 AD. The object of the game was for a force of Huns with their Gothic allies to escape through the central section of the table. I played this game twice. Once as the Huns and Once as the Romans. This was a great game with lots of interesting aspects. I would be happy to play it again as I think I could do better as the Romans and could also be more successful as the Huns despite winning that clash.
Gothic cavalry advancing
Deep unit of a Gothic Warband. This was to prove to be a tough nut to crack in all the games. 
The Roman Watchtower can be seen on the hill before the Huns. Hunic light archers can be seen scouting ahead of the rest of their forces. 
Roman troops holding the hill line under fire from Hunic horse archers. 
Light Cavalry advancing 
Rapid movement brought both sides into conflict almost from the start of the game. 
Superb figures from Simon's collection

General view of the action showing the Roman line still in tacked. 
Horse Archers in action again. We played both games with the Huns unable to resupply themselves with arrows so it was necessary to use them wisely.
Attilla can be seen at the head of his lance armed bodyguard
The Romans have lit the beacon to warn other stations of the Huns. Or it may just have been to celebrate the Queen's 90th Birthday! (Contemporary reference)
Roman Light troops keeping watch 
Auxiliaries supporting them
Mobs of disgruntled citizens erupt from the town to protest over high taxes! These were to also prove to be remarkable tough 
Final stage of the game as the Huns, Goths and towns folk deal with the last of the Romans.
I missed photographing the Gothic Warband being attacked in both flanks and the rear and still being able to fight on! I won this game as the Huns but lost it as the Romans. But as I said I would be happy to play it again as there was a lot to think about. The next post will cover the Raphia game. This was so spectacular that it needs a whole post to itself!